Difference between revisions of "RCUG 5 RootCause Demo"
m |
m |
||
| Line 37: | Line 37: | ||
Before running this RootCause Demo, you must install and set up to use RootCause as described in | Before running this RootCause Demo, you must install and set up to use RootCause as described in | ||
| − | [["rcc-7.html#MARKER-9-508">Chapter 4, "Getting Started"</DIV> | + | <!-- [["rcc-7.html#MARKER-9-508">Chapter 4, "Getting Started"</DIV> --> |
[[RCUG_4_Getting_Started#MARKER-9-508|Chapter 4, "Getting Started"]]. This will define the APROBE environment variable which is necessary to use RootCause. | [[RCUG_4_Getting_Started#MARKER-9-508|Chapter 4, "Getting Started"]]. This will define the APROBE environment variable which is necessary to use RootCause. | ||
| Line 52: | Line 52: | ||
Lastly, make sure your DISPLAY environment variable is set. If you're using a Windows client that is running X emulator software such as eXceed or Reflection, we recommend you move to a Unix display for your initial evaluation. If this is impractical, see | Lastly, make sure your DISPLAY environment variable is set. If you're using a Windows client that is running X emulator software such as eXceed or Reflection, we recommend you move to a Unix display for your initial evaluation. If this is impractical, see | ||
| − | [["rcc-11.html#MARKER-9-1878">"X-emulators: (Exceed, Reflection)"</DIV> | + | <!-- [["rcc-11.html#MARKER-9-1878">"X-emulators: (Exceed, Reflection)"</DIV> --> |
[[RCUG_RootCause_GUI_Reference|CHAPTER 8 - RootCause GUI Reference]]. | [[RCUG_RootCause_GUI_Reference|CHAPTER 8 - RootCause GUI Reference]]. | ||
| Line 71: | Line 71: | ||
<DIV ID=MARKER-10-716></DIV> | <DIV ID=MARKER-10-716></DIV> | ||
The <CODE>rootcause_on</CODE> command enables the automatic logging of every process that is started, and <CODE>rootcause_off</CODE> disables this logging. When the pi_demo program is " | The <CODE>rootcause_on</CODE> command enables the automatic logging of every process that is started, and <CODE>rootcause_off</CODE> disables this logging. When the pi_demo program is " | ||
| − | [["rcc-6.html#MARKER-9-451">register</DIV> | + | <!-- [["rcc-6.html#MARKER-9-451">register</DIV> --> |
[[RCUG_3_Terminology_and_Concepts|CHAPTER 3 - Terminology and Concepts]]ed" with RootCause, it will be traced according to your specifications as well as simply being logged. The illustration below shows the set up and demo execution.. | [[RCUG_3_Terminology_and_Concepts|CHAPTER 3 - Terminology and Concepts]]ed" with RootCause, it will be traced according to your specifications as well as simply being logged. The illustration below shows the set up and demo execution.. | ||
| Line 79: | Line 79: | ||
<DIV ID=MARKER-10-717></DIV> | <DIV ID=MARKER-10-717></DIV> | ||
NOTE: On AIX, the above process is slightly different than shown above. The invocation of the program must be done with the | NOTE: On AIX, the above process is slightly different than shown above. The invocation of the program must be done with the | ||
| − | [["rcc-12.html#MARKER-9-2119">rootcause run</DIV> | + | <!-- [["rcc-12.html#MARKER-9-2119">rootcause run</DIV> --> |
[[RCUG_RootCause_Command_Reference|CHAPTER 9 - RootCause Command Reference]] command directly. For example, the above sequence is changed to: | [[RCUG_RootCause_Command_Reference|CHAPTER 9 - RootCause Command Reference]] command directly. For example, the above sequence is changed to: | ||
<PRE> | <PRE> | ||
| Line 87: | Line 87: | ||
<DIV ID=MARKER-10-718></DIV> | <DIV ID=MARKER-10-718></DIV> | ||
See | See | ||
| − | [["rcc-7.html#MARKER-9-532">"Enabling RootCause for an AIX Application"</DIV> | + | <!-- [["rcc-7.html#MARKER-9-532">"Enabling RootCause for an AIX Application"</DIV> --> |
[[RCUG_4_Getting_Started#MARKER-9-532|"Enabling RootCause for an AIX Application"]]. | [[RCUG_4_Getting_Started#MARKER-9-532|"Enabling RootCause for an AIX Application"]]. | ||
| Line 102: | Line 102: | ||
This will open the RootCause main window, and then a view of the RootCause log. This shows the <EM> | This will open the RootCause main window, and then a view of the RootCause log. This shows the <EM> | ||
| − | [["rcc-11.html#MARKER-9-1725">Trace Display</DIV> | + | <!-- [["rcc-11.html#MARKER-9-1725">Trace Display</DIV> --> |
[[RCUG_RootCause_GUI_Reference|CHAPTER 8 - RootCause GUI Reference]]</EM> window, the window for viewing all trace events. On the left is the Event Tree; on the upper right is the source/text window; and on the lower right is the "details" window. In the text window you will see some information about the log file. | [[RCUG_RootCause_GUI_Reference|CHAPTER 8 - RootCause GUI Reference]]</EM> window, the window for viewing all trace events. On the left is the Event Tree; on the upper right is the source/text window; and on the lower right is the "details" window. In the text window you will see some information about the log file. | ||
| Line 111: | Line 111: | ||
<DIV ID=MARKER-10-724></DIV> | <DIV ID=MARKER-10-724></DIV> | ||
Locate the APP_START event (in the Trace Event window) associated with the <CODE>pi_demo</CODE> program run earlier. To view information about this event, select the APP_START node in the event tree with a left click. This will fill in "details" about that event in the lower right window.With the APP_START pi_demo node highlighted, right-click to bring up the | Locate the APP_START event (in the Trace Event window) associated with the <CODE>pi_demo</CODE> program run earlier. To view information about this event, select the APP_START node in the event tree with a left click. This will fill in "details" about that event in the lower right window.With the APP_START pi_demo node highlighted, right-click to bring up the | ||
| − | [["rcc-11.html#MARKER-9-1826">Trace Display Popup Menu</DIV> | + | <!-- [["rcc-11.html#MARKER-9-1826">Trace Display Popup Menu</DIV> --> |
[[RCUG_RootCause_GUI_Reference|CHAPTER 8 - RootCause GUI Reference]]. | [[RCUG_RootCause_GUI_Reference|CHAPTER 8 - RootCause GUI Reference]]. | ||
<DIV ID=MARKER-10-725></DIV> | <DIV ID=MARKER-10-725></DIV> | ||
Click <EM> | Click <EM> | ||
| − | [["rcc-11.html#MARKER-9-1730">Open Associated Workspace</DIV> | + | <!-- [["rcc-11.html#MARKER-9-1730">Open Associated Workspace</DIV> --> |
[[RCUG_RootCause_GUI_Reference|CHAPTER 8 - RootCause GUI Reference]]</EM> in the popup-menu of the pi_demo APP_START event. | [[RCUG_RootCause_GUI_Reference|CHAPTER 8 - RootCause GUI Reference]]</EM> in the popup-menu of the pi_demo APP_START event. | ||
| Line 126: | Line 126: | ||
<DIV ID=MARKER-2-728></DIV> | <DIV ID=MARKER-2-728></DIV> | ||
This will open a <EM> | This will open a <EM> | ||
| − | [["rcc-11.html#MARKER-9-1434">New Workspace Dialog</DIV> | + | <!-- [["rcc-11.html#MARKER-9-1434">New Workspace Dialog</DIV> --> |
[[RCUG_RootCause_GUI_Reference|CHAPTER 8 - RootCause GUI Reference]]</EM> with the program name and default workspace filled in. | [[RCUG_RootCause_GUI_Reference|CHAPTER 8 - RootCause GUI Reference]]</EM> with the program name and default workspace filled in. | ||
| Line 145: | Line 145: | ||
<DIV ID=MARKER-10-731></DIV> | <DIV ID=MARKER-10-731></DIV> | ||
| − | |||
<!-- <IMG ALIGN=TOP SRC="sol_cpp_new.gif"> --> | <!-- <IMG ALIGN=TOP SRC="sol_cpp_new.gif"> --> | ||
[[File:RCUG5_sol_cpp_new.gif|600px]] | [[File:RCUG5_sol_cpp_new.gif|600px]] | ||
| Line 164: | Line 163: | ||
<DIV ID=MARKER-10-736></DIV> | <DIV ID=MARKER-10-736></DIV> | ||
You now see the <EM>RootCause | You now see the <EM>RootCause | ||
| − | [["rcc-11.html#MARKER-9-1321">Workspace Browser</DIV> | + | <!-- [["rcc-11.html#MARKER-9-1321">Workspace Browser</DIV> --> |
[[RCUG_RootCause_GUI_Reference|CHAPTER 8 - RootCause GUI Reference]]</EM>. This is described in detail in | [[RCUG_RootCause_GUI_Reference|CHAPTER 8 - RootCause GUI Reference]]</EM>. This is described in detail in | ||
| − | [["rcc-11.html#MARKER-9-1320">Chapter 8, "RootCause GUI Reference"</DIV> | + | <!-- [["rcc-11.html#MARKER-9-1320">Chapter 8, "RootCause GUI Reference"</DIV> --> |
[[RCUG_RootCause_GUI_Reference|CHAPTER 8 - RootCause GUI Reference]]. | [[RCUG_RootCause_GUI_Reference|CHAPTER 8 - RootCause GUI Reference]]. | ||
| Line 183: | Line 182: | ||
<UL> | <UL> | ||
<LI>Predefined UALs selected from the | <LI>Predefined UALs selected from the | ||
| − | [["rcc-11.html#MARKER-9-1323">Workspace Tree</DIV> | + | <!-- [["rcc-11.html#MARKER-9-1323">Workspace Tree</DIV> --> |
[[RCUG_RootCause_GUI_Reference|CHAPTER 8 - RootCause GUI Reference]]; | [[RCUG_RootCause_GUI_Reference|CHAPTER 8 - RootCause GUI Reference]]; | ||
<LI>Method and Line traces selected from the | <LI>Method and Line traces selected from the | ||
| − | [["rcc-11.html#MARKER-9-1531">Trace Setup Dialog</DIV> | + | <!-- [["rcc-11.html#MARKER-9-1531">Trace Setup Dialog</DIV> --> |
[[RCUG_RootCause_GUI_Reference|CHAPTER 8 - RootCause GUI Reference]]; | [[RCUG_RootCause_GUI_Reference|CHAPTER 8 - RootCause GUI Reference]]; | ||
<LI>Probes to gather or preserve data, also selected in the | <LI>Probes to gather or preserve data, also selected in the | ||
| − | [["rcc-11.html#MARKER-9-1531">Trace Setup Dialog</DIV> | + | <!-- [["rcc-11.html#MARKER-9-1531">Trace Setup Dialog</DIV> --> |
[[RCUG_RootCause_GUI_Reference|CHAPTER 8 - RootCause GUI Reference]]; and | [[RCUG_RootCause_GUI_Reference|CHAPTER 8 - RootCause GUI Reference]]; and | ||
<LI>User-written custom probes as described in | <LI>User-written custom probes as described in | ||
| − | [["rcc-13.html#MARKER-9-2198">"Writing Custom Probes"</DIV> | + | <!-- [["rcc-13.html#MARKER-9-2198">"Writing Custom Probes"</DIV> --> |
[[RCUG_7_Selected_Topics|CHAPTER 10 - Selected Topics]]. | [[RCUG_7_Selected_Topics|CHAPTER 10 - Selected Topics]]. | ||
</UL> | </UL> | ||
| Line 210: | Line 209: | ||
Under the | Under the | ||
| − | [["rcc-11.html#MARKER-9-1330">UALs node</DIV> | + | <!-- [["rcc-11.html#MARKER-9-1330">UALs node</DIV> --> |
[[RCUG_RootCause_GUI_Reference|CHAPTER 8 - RootCause GUI Reference]] in the | [[RCUG_RootCause_GUI_Reference|CHAPTER 8 - RootCause GUI Reference]] in the | ||
| − | [["rcc-11.html#MARKER-9-1323">Workspace Tree</DIV> | + | <!-- [["rcc-11.html#MARKER-9-1323">Workspace Tree</DIV> --> |
[[RCUG_RootCause_GUI_Reference|CHAPTER 8 - RootCause GUI Reference]]: | [[RCUG_RootCause_GUI_Reference|CHAPTER 8 - RootCause GUI Reference]]: | ||
| Line 230: | Line 229: | ||
<OL> | <OL> | ||
<LI>Click on the <EM> | <LI>Click on the <EM> | ||
| − | [["rcc-11.html#MARKER-9-1426">Setup</DIV> | + | <!-- [["rcc-11.html#MARKER-9-1426">Setup</DIV> --> |
[[RCUG_RootCause_GUI_Reference|CHAPTER 8 - RootCause GUI Reference]]</EM> button in the button bar. | [[RCUG_RootCause_GUI_Reference|CHAPTER 8 - RootCause GUI Reference]]</EM> button in the button bar. | ||
</OL> | </OL> | ||
| Line 243: | Line 242: | ||
<DIV ID=MARKER-10-753></DIV> | <DIV ID=MARKER-10-753></DIV> | ||
This will open the <EM> | This will open the <EM> | ||
| − | [["rcc-11.html#MARKER-9-1531">Trace Setup Dialog</DIV> | + | <!-- [["rcc-11.html#MARKER-9-1531">Trace Setup Dialog</DIV> --> |
[[RCUG_RootCause_GUI_Reference|CHAPTER 8 - RootCause GUI Reference]]</EM>, showing the modules of the application in the <EM> | [[RCUG_RootCause_GUI_Reference|CHAPTER 8 - RootCause GUI Reference]]</EM>, showing the modules of the application in the <EM> | ||
| − | [["rcc-11.html#MARKER-9-1533">Program Contents Tree</DIV> | + | <!-- [["rcc-11.html#MARKER-9-1533">Program Contents Tree</DIV> --> |
[[RCUG_RootCause_GUI_Reference|CHAPTER 8 - RootCause GUI Reference]]</EM>. The | [[RCUG_RootCause_GUI_Reference|CHAPTER 8 - RootCause GUI Reference]]</EM>. The | ||
| − | [["rcc-11.html#MARKER-9-1533">Program Contents Tree</DIV> | + | <!-- [["rcc-11.html#MARKER-9-1533">Program Contents Tree</DIV> --> |
[[RCUG_RootCause_GUI_Reference|CHAPTER 8 - RootCause GUI Reference]] identifies the modules, files, functions, methods, and data in the program, and allows you to specify complex actions on each function and method. | [[RCUG_RootCause_GUI_Reference|CHAPTER 8 - RootCause GUI Reference]] identifies the modules, files, functions, methods, and data in the program, and allows you to specify complex actions on each function and method. | ||
| Line 258: | Line 257: | ||
<LI>Click on the <CODE>pi_demo.cpp</CODE> source file node, then right-click to see the <EM> | <LI>Click on the <CODE>pi_demo.cpp</CODE> source file node, then right-click to see the <EM> | ||
| − | [["rcc-11.html#MARKER-9-1545">Trace Setup Popup Menu</DIV> | + | <!-- [["rcc-11.html#MARKER-9-1545">Trace Setup Popup Menu</DIV> --> |
[[RCUG_RootCause_GUI_Reference|CHAPTER 8 - RootCause GUI Reference]]</EM>. | [[RCUG_RootCause_GUI_Reference|CHAPTER 8 - RootCause GUI Reference]]</EM>. | ||
<DIV ID=MARKER-10-756></DIV> | <DIV ID=MARKER-10-756></DIV> | ||
<LI>Click <EM> | <LI>Click <EM> | ||
| − | [["rcc-11.html#MARKER-9-1557">Trace All In</DIV> | + | <!-- [["rcc-11.html#MARKER-9-1557">Trace All In</DIV> --> |
[[RCUG_RootCause_GUI_Reference|CHAPTER 8 - RootCause GUI Reference]]</EM> pi_demo.cpp. | [[RCUG_RootCause_GUI_Reference|CHAPTER 8 - RootCause GUI Reference]]</EM> pi_demo.cpp. | ||
| Line 283: | Line 282: | ||
<DIV ID=MARKER-10-761></DIV> | <DIV ID=MARKER-10-761></DIV> | ||
As was done in the preceding section, | As was done in the preceding section, | ||
| − | [["#MARKER-9-713">"Run With RootCause"</DIV> | + | <!-- [["#MARKER-9-713">"Run With RootCause"</DIV> --> |
| − | [[]], run the following commands: | + | [["#MARKER-9-713"|"Run With RootCause"]], run the following commands: |
<PRE> | <PRE> | ||
rootcause_on | rootcause_on | ||
| Line 300: | Line 299: | ||
<DIV ID=MARKER-10-764></DIV> | <DIV ID=MARKER-10-764></DIV> | ||
This time, since the program is registered with a workspace, it will be traced as specified in the workspace, and the resulting output will be recorded within the workspace. There will be some startup delay, but if you notice that the program runs slower once started, this is probably because your workspace is being accessed across the network from your machine. See | This time, since the program is registered with a workspace, it will be traced as specified in the workspace, and the resulting output will be recorded within the workspace. There will be some startup delay, but if you notice that the program runs slower once started, this is probably because your workspace is being accessed across the network from your machine. See | ||
| − | [["rcc-13.html#MARKER-9-2164">"RootCause and Efficiency Concerns"</DIV> | + | <!-- [["rcc-13.html#MARKER-9-2164">"RootCause and Efficiency Concerns"</DIV> --> |
[[RCUG_7_Selected_Topics|CHAPTER 10 - Selected Topics]]. | [[RCUG_7_Selected_Topics|CHAPTER 10 - Selected Topics]]. | ||
| Line 309: | Line 308: | ||
We're now ready to view the data generated by running with our Trace. This is discussed in detail in | We're now ready to view the data generated by running with our Trace. This is discussed in detail in | ||
| − | [["rcc-6.html#MARKER-9-366">"RootCause Data Management"</DIV> | + | <!-- [["rcc-6.html#MARKER-9-366">"RootCause Data Management"</DIV> --> |
[[RCUG_3_Terminology_and_Concepts|CHAPTER 3 - Terminology and Concepts]]. | [[RCUG_3_Terminology_and_Concepts|CHAPTER 3 - Terminology and Concepts]]. | ||
In the | In the | ||
| − | [["rcc-11.html#MARKER-9-1321">Workspace Browser</DIV> | + | <!-- [["rcc-11.html#MARKER-9-1321">Workspace Browser</DIV> --> |
[[RCUG_RootCause_GUI_Reference|CHAPTER 8 - RootCause GUI Reference]] window, do the following: | [[RCUG_RootCause_GUI_Reference|CHAPTER 8 - RootCause GUI Reference]] window, do the following: | ||
<OL> | <OL> | ||
<LI>Click the | <LI>Click the | ||
| − | [["rcc-11.html#MARKER-9-1431">Index</DIV> | + | <!-- [["rcc-11.html#MARKER-9-1431">Index</DIV> --> |
[[RCUG_RootCause_GUI_Reference|CHAPTER 8 - RootCause GUI Reference]] button. This will bring up the <EM> | [[RCUG_RootCause_GUI_Reference|CHAPTER 8 - RootCause GUI Reference]] button. This will bring up the <EM> | ||
| − | [["rcc-11.html#MARKER-9-1680">Trace Index Dialog</DIV> | + | <!-- [["rcc-11.html#MARKER-9-1680">Trace Index Dialog</DIV> --> |
[[RCUG_RootCause_GUI_Reference|CHAPTER 8 - RootCause GUI Reference]]</EM> for the most recently generated data. | [[RCUG_RootCause_GUI_Reference|CHAPTER 8 - RootCause GUI Reference]]</EM> for the most recently generated data. | ||
<LI>In the Trace Index Dialog, click the | <LI>In the Trace Index Dialog, click the | ||
| − | [["rcc-11.html#MARKER-9-1699">Select Events</DIV> | + | <!-- [["rcc-11.html#MARKER-9-1699">Select Events</DIV> --> |
[[RCUG_RootCause_GUI_Reference|CHAPTER 8 - RootCause GUI Reference]] button. | [[RCUG_RootCause_GUI_Reference|CHAPTER 8 - RootCause GUI Reference]] button. | ||
<LI>In the | <LI>In the | ||
| − | [["rcc-11.html#MARKER-9-1711">Select Events Dialog</DIV> | + | <!-- [["rcc-11.html#MARKER-9-1711">Select Events Dialog</DIV> --> |
[[RCUG_RootCause_GUI_Reference|CHAPTER 8 - RootCause GUI Reference]], check "Exceptions" to index exception events, then click | [[RCUG_RootCause_GUI_Reference|CHAPTER 8 - RootCause GUI Reference]], check "Exceptions" to index exception events, then click | ||
| − | [["rcc-11.html#MARKER-9-1718">Update</DIV> | + | <!-- [["rcc-11.html#MARKER-9-1718">Update</DIV> --> |
[[RCUG_RootCause_GUI_Reference|CHAPTER 8 - RootCause GUI Reference]] to close the dialog and refresh the Index. You should now see something like the dialog below: | [[RCUG_RootCause_GUI_Reference|CHAPTER 8 - RootCause GUI Reference]] to close the dialog and refresh the Index. You should now see something like the dialog below: | ||
</OL> | </OL> | ||
| Line 357: | Line 356: | ||
<DIV ID=MARKER-10-769></DIV> | <DIV ID=MARKER-10-769></DIV> | ||
The C++ Exception trace event selected from the index should appear highlighted in the Trace Display. This was a result of checking exceptions under | The C++ Exception trace event selected from the index should appear highlighted in the Trace Display. This was a result of checking exceptions under | ||
| − | [["#MARKER-9-741">"Enable a UAL"</DIV> | + | <!-- [["#MARKER-9-741">"Enable a UAL"</DIV> --> |
| − | [[]] above. | + | [["#MARKER-9-741"|"Enable a UAL"]] above. |
<DIV ID=MARKER-10-770></DIV> | <DIV ID=MARKER-10-770></DIV> | ||
| Line 364: | Line 363: | ||
<DIV ID=MARKER-10-772></DIV> | <DIV ID=MARKER-10-772></DIV> | ||
The ENTER and EXIT nodes are a result of the "Trace All In pi_demo.exe" action added under | The ENTER and EXIT nodes are a result of the "Trace All In pi_demo.exe" action added under | ||
| − | [["#MARKER-9-744">"Define Function Traces"</DIV> | + | <!-- [["#MARKER-9-744">"Define Function Traces"</DIV> --> |
| − | [[]] above. | + | [["#MARKER-9-744"|"Define Function Traces"]] above. |
<DIV ID=MARKER-10-773></DIV> | <DIV ID=MARKER-10-773></DIV> | ||
<DIV ID=MARKER-10-774></DIV> | <DIV ID=MARKER-10-774></DIV> | ||
You can see more information about the exception in the | You can see more information about the exception in the | ||
| − | [["rcc-11.html#MARKER-9-1830">Event Details Pane</DIV> | + | <!-- [["rcc-11.html#MARKER-9-1830">Event Details Pane</DIV> --> |
[[RCUG_RootCause_GUI_Reference|CHAPTER 8 - RootCause GUI Reference]] in the lower right. | [[RCUG_RootCause_GUI_Reference|CHAPTER 8 - RootCause GUI Reference]] in the lower right. | ||
| Line 381: | Line 380: | ||
<DIV ID=MARKER-2-779></DIV> | <DIV ID=MARKER-2-779></DIV> | ||
The event tree is a call tree, and can be very useful. From an ENTER or EXIT node in the tree you can use the <EM> | The event tree is a call tree, and can be very useful. From an ENTER or EXIT node in the tree you can use the <EM> | ||
| − | [["rcc-11.html#MARKER-9-1826">Trace Display Popup Menu</DIV> | + | <!-- [["rcc-11.html#MARKER-9-1826">Trace Display Popup Menu</DIV> --> |
[[RCUG_RootCause_GUI_Reference|CHAPTER 8 - RootCause GUI Reference]]</EM> to: | [[RCUG_RootCause_GUI_Reference|CHAPTER 8 - RootCause GUI Reference]]</EM> to: | ||
| Line 395: | Line 394: | ||
<DIV ID=MARKER-2-784></DIV> | <DIV ID=MARKER-2-784></DIV> | ||
<LI>go to the function in the <EM> | <LI>go to the function in the <EM> | ||
| − | [["rcc-11.html#MARKER-9-1531">Trace Setup Dialog</DIV> | + | <!-- [["rcc-11.html#MARKER-9-1531">Trace Setup Dialog</DIV> --> |
[[RCUG_RootCause_GUI_Reference|CHAPTER 8 - RootCause GUI Reference]]</EM> to trace additional information. | [[RCUG_RootCause_GUI_Reference|CHAPTER 8 - RootCause GUI Reference]]</EM> to trace additional information. | ||
</UL> | </UL> | ||
As you step to each event, the <EM> | As you step to each event, the <EM> | ||
| − | [["rcc-11.html#MARKER-9-1830">Event Details Pane</DIV> | + | <!-- [["rcc-11.html#MARKER-9-1830">Event Details Pane</DIV> --> |
[[RCUG_RootCause_GUI_Reference|CHAPTER 8 - RootCause GUI Reference]]</EM> may show additional information about that event. See | [[RCUG_RootCause_GUI_Reference|CHAPTER 8 - RootCause GUI Reference]]</EM> may show additional information about that event. See | ||
| − | [["rcc-11.html#MARKER-9-1725">"Trace Display"</DIV> | + | <!-- [["rcc-11.html#MARKER-9-1725">"Trace Display"</DIV> --> |
[[RCUG_RootCause_GUI_Reference|CHAPTER 8 - RootCause GUI Reference]] for a more complete description of this window. | [[RCUG_RootCause_GUI_Reference|CHAPTER 8 - RootCause GUI Reference]] for a more complete description of this window. | ||
| Line 419: | Line 418: | ||
<LI>Select (left-click) the SYN_CALL_COUNTS node, near the end of the event tree. | <LI>Select (left-click) the SYN_CALL_COUNTS node, near the end of the event tree. | ||
| − | <LI | + | <LI>Right-click (with MB3) to show the <EM> |
| − | [["rcc-11.html#MARKER-9-1826">Trace Display Popup Menu</DIV> | + | <!-- [["rcc-11.html#MARKER-9-1826">Trace Display Popup Menu</DIV> --> |
| − | [[RCUG_RootCause_GUI_Reference|CHAPTER 8 - RootCause GUI Reference]]</EM> on this node. | + | [[RCUG_RootCause_GUI_Reference|CHAPTER 8 - RootCause GUI Reference]]</EM> on this node. |
| − | < | + | <DIV ID=MARKER-10-789></DIV> |
| − | [["rcc-11.html#MARKER-9-1761">Show Associated Table</DIV> | + | <LI>Click <EM> |
| − | [[RCUG_RootCause_GUI_Reference|CHAPTER 8 - RootCause GUI Reference]]</EM>. This will open a table listing each called function | + | <!-- [["rcc-11.html#MARKER-9-1761">Show Associated Table</DIV> --> |
| + | [[RCUG_RootCause_GUI_Reference|CHAPTER 8 - RootCause GUI Reference]]</EM>. This will open a table listing each called function and the number of times it was called. | ||
| − | < | + | <DIV ID=MARKER-10-790></DIV> |
| + | <LI>Select (left-click) the <CODE>extern:"_start()"</CODE> entry in the call count table. | ||
<LI>Right click to show the popup menu. | <LI>Right click to show the popup menu. | ||
<LI>Select <EM> | <LI>Select <EM> | ||
| − | [["rcc-11.html#MARKER-9-1746">Deselect Function In Trace Setup</DIV> | + | <!-- [["rcc-11.html#MARKER-9-1746">Deselect Function In Trace Setup</DIV> --> |
[[RCUG_RootCause_GUI_Reference|CHAPTER 8 - RootCause GUI Reference]]</EM> in the popup menu. | [[RCUG_RootCause_GUI_Reference|CHAPTER 8 - RootCause GUI Reference]]</EM> in the popup menu. | ||
</OL> | </OL> | ||
| − | < | + | <DIV ID=MARKER-10-791></DIV> |
| − | [["rcc-11.html#MARKER-9-1759">Find Function In Trace Events</DIV> | + | You can also <EM> |
| − | [[RCUG_RootCause_GUI_Reference|CHAPTER 8 - RootCause GUI Reference]]</EM> to search for functions | + | <!-- [["rcc-11.html#MARKER-9-1759">Find Function In Trace Events</DIV> --> |
| + | [[RCUG_RootCause_GUI_Reference|CHAPTER 8 - RootCause GUI Reference]]</EM> to search for functions in the call tree, and remove them from there. | ||
| − | + | <DIV ID=MARKER-10-792></DIV> | |
| + | <DIV ID=MARKER-10-793></DIV> | ||
| + | You can also search for functions in the call tree, and remove them from there. | ||
<DIV ID=MARKER-10-794></DIV> | <DIV ID=MARKER-10-794></DIV> | ||
| − | |||
<!-- <IMG ALIGN=TOP SRC="sol_cpp_calls.gif"> --> | <!-- <IMG ALIGN=TOP SRC="sol_cpp_calls.gif"> --> | ||
[[File:RCUG5_sol_cpp_calls.gif|330px]] | [[File:RCUG5_sol_cpp_calls.gif|330px]] | ||
| + | <DIV ID=MARKER-2-795></DIV> | ||
| + | <DIV ID=MARKER-10-796></DIV> | ||
<OL> | <OL> | ||
| − | <LI | + | <LI>When you've finished making changes to the trace, click the <EM>Dismiss</EM> button at the bottom of the SYN_CALL_COUNTS table window, and then |
| − | + | <DIV ID=MARKER-2-797></DIV> | |
| − | [["rcc-11.html#MARKER-9-1427">Build</DIV> | + | <LI>Click the <EM> |
| − | [[RCUG_RootCause_GUI_Reference|CHAPTER 8 - RootCause GUI Reference]]</EM> button in the main window. | + | <!-- [["rcc-11.html#MARKER-9-1427">Build</DIV> --> |
| + | [[RCUG_RootCause_GUI_Reference|CHAPTER 8 - RootCause GUI Reference]]</EM> button in the main window. | ||
| − | <LI | + | <LI>Notice the effects of removing these calls in the next trace we generate. |
</OL> | </OL> | ||
| − | + | NOTE: In most "real" programs, high-overhead functions selected for tracing are automatically identified and disabled via | |
| + | <!-- [["rcc-6.html#MARKER-9-433">load shedding</DIV> --> | ||
[[RCUG_3_Terminology_and_Concepts|CHAPTER 3 - Terminology and Concepts]], and are listed in the | [[RCUG_3_Terminology_and_Concepts|CHAPTER 3 - Terminology and Concepts]], and are listed in the | ||
| − | [["rcc-11.html#MARKER-9-1857">LOAD_SHED Table</DIV> | + | <!-- [["rcc-11.html#MARKER-9-1857">LOAD_SHED Table</DIV> --> |
[[RCUG_RootCause_GUI_Reference|CHAPTER 8 - RootCause GUI Reference]] associated with the LOAD_SHED node at the end of the event tree. This demo doesn't run long enough for the load shedding heuristics to apply. See | [[RCUG_RootCause_GUI_Reference|CHAPTER 8 - RootCause GUI Reference]] associated with the LOAD_SHED node at the end of the event tree. This demo doesn't run long enough for the load shedding heuristics to apply. See | ||
| − | [["rcc-6.html#MARKER-9-374">"RootCause Overhead Management"</DIV> | + | <!-- [["rcc-6.html#MARKER-9-374">"RootCause Overhead Management"</DIV> --> |
| − | [[RCUG_3_Terminology_and_Concepts|CHAPTER 3 - Terminology and Concepts]] for a general discussion of load shedding. | + | [[RCUG_3_Terminology_and_Concepts|CHAPTER 3 - Terminology and Concepts]] for a general discussion of load shedding. |
<DIV ID=HEADING8-112></DIV> | <DIV ID=HEADING8-112></DIV> | ||
| Line 469: | Line 476: | ||
== Tracing The Details == | == Tracing The Details == | ||
| − | + | So far we have seen how the RootCause process works by: | |
| + | <DIV ID=MARKER-10-798></DIV> | ||
<UL> | <UL> | ||
| − | <LI | + | <LI>enabling a predefined UAL (exceptions); |
| − | <LI | + | <LI>defining a simple trace from the Trace Setup Dialog; |
| − | <LI | + | <LI>running the application under RootCause; |
| − | <LI | + | <LI>choosing an event in the Trace Index Dialog; |
| − | <LI | + | <LI>viewing events in the Trace Display; and |
| − | + | <DIV ID=MARKER-10-799></DIV> | |
| + | <LI>modifying the trace by selecting functions from the call counts table. | ||
</UL> | </UL> | ||
| − | < | + | <DIV ID=MARKER-10-800></DIV> |
| + | RootCause allows you to record much more than the entry and exit of functions and threads. You can record data values and insert probes as well. | ||
<!-- <H3> Open Trace Setup</H3> --> | <!-- <H3> Open Trace Setup</H3> --> | ||
| Line 491: | Line 501: | ||
<OL> | <OL> | ||
| − | <LI | + | <LI>Click the |
| − | [["rcc-11.html#MARKER-9-1426">Setup</DIV> | + | <!-- [["rcc-11.html#MARKER-9-1426">Setup</DIV> --> |
[[RCUG_RootCause_GUI_Reference|CHAPTER 8 - RootCause GUI Reference]] button in the Workspace Browser to return to the | [[RCUG_RootCause_GUI_Reference|CHAPTER 8 - RootCause GUI Reference]] button in the Workspace Browser to return to the | ||
| − | [["rcc-11.html#MARKER-9-1531">Trace Setup Dialog</DIV> | + | <!-- [["rcc-11.html#MARKER-9-1531">Trace Setup Dialog</DIV> --> |
| − | [[RCUG_RootCause_GUI_Reference|CHAPTER 8 - RootCause GUI Reference]]. | + | [[RCUG_RootCause_GUI_Reference|CHAPTER 8 - RootCause GUI Reference]]. |
| − | < | + | <DIV ID=MARKER-10-801></DIV> |
| − | [["#MARKER-9-738">"Define the Trace"</DIV> | + | <DIV ID=MARKER-10-802></DIV> |
| − | [[]] above, but this time we'll record some details about a specific function | + | <DIV ID=MARKER-10-803></DIV> |
| + | This is just as in | ||
| + | <!-- [["#MARKER-9-738">"Define the Trace"</DIV> --> | ||
| + | [["#MARKER-9-738"|"Define the Trace"]] above, but this time we'll record some details about a specific function, <CODE>::ataninvint</CODE>. | ||
</OL> | </OL> | ||
| Line 507: | Line 520: | ||
<OL> | <OL> | ||
| − | <LI | + | <LI>Click the "lever" to expand the <B>M</B> pi_demo node to see the Source Files in the module. |
| − | + | <DIV ID=MARKER-2-805></DIV> | |
| + | <DIV ID=MARKER-2-806></DIV> | ||
| + | <DIV ID=MARKER-10-807></DIV> | ||
| + | <LI>Expand the pi.cpp node to see the methods. | ||
| − | < | + | <DIV ID=MARKER-10-808></DIV> |
| − | [["rcc-11.html#MARKER-9-1574">Source Pane</DIV> | + | <LI>Select the <CODE>ataninvint</CODE> method. This will bring up the source code for this method in the |
| − | [[RCUG_RootCause_GUI_Reference|CHAPTER 8 - RootCause GUI Reference]], and show a tree of data to log in <CODE>ataninvint </CODE | + | <!-- [["rcc-11.html#MARKER-9-1574">Source Pane</DIV> --> |
| − | [["rcc-11.html#MARKER-9-1579">Variables Pane</DIV> | + | [[RCUG_RootCause_GUI_Reference|CHAPTER 8 - RootCause GUI Reference]], and show a tree of data to log in <CODE>ataninvint </CODE>in the <EM> |
| − | [[RCUG_RootCause_GUI_Reference|CHAPTER 8 - RootCause GUI Reference]]</EM>. | + | <!-- [["rcc-11.html#MARKER-9-1579">Variables Pane</DIV> --> |
| + | [[RCUG_RootCause_GUI_Reference|CHAPTER 8 - RootCause GUI Reference]]</EM>. | ||
</OL> | </OL> | ||
| Line 521: | Line 538: | ||
=== Log Parameters === | === Log Parameters === | ||
| + | <DIV ID=MARKER-10-809></DIV> | ||
<OL> | <OL> | ||
| − | <LI | + | <LI>Check the box for variable X in the <EM>Visible On Entry</EM> subtree, and for the return value in the <EM>Visible On Exit</EM> subtree. |
</OL> | </OL> | ||
<DIV ID=MARKER-10-810></DIV> | <DIV ID=MARKER-10-810></DIV> | ||
| − | |||
<DIV ID=MARKER-10-811></DIV> | <DIV ID=MARKER-10-811></DIV> | ||
| − | |||
<!-- <IMG ALIGN=TOP SRC="sol_cpp_vars.gif"> --> | <!-- <IMG ALIGN=TOP SRC="sol_cpp_vars.gif"> --> | ||
[[File:RCUG5_sol_cpp_vars.gif|600px]] | [[File:RCUG5_sol_cpp_vars.gif|600px]] | ||
| Line 536: | Line 552: | ||
=== Add a Snapshot Probe === | === Add a Snapshot Probe === | ||
| + | <DIV ID=MARKER-2-813></DIV> | ||
| + | <DIV ID=MARKER-10-814></DIV> | ||
<OL> | <OL> | ||
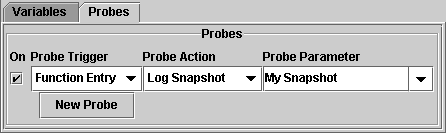
| − | <LI | + | <LI>In that same lower-right area, click on the <EM>Probes</EM> tab to show the <EM> |
| − | [["rcc-11.html#MARKER-9-1589">Probes Pane</DIV> | + | <!-- [["rcc-11.html#MARKER-9-1589">Probes Pane</DIV> --> |
[[RCUG_RootCause_GUI_Reference|CHAPTER 8 - RootCause GUI Reference]]</EM>. Probes in this context are special | [[RCUG_RootCause_GUI_Reference|CHAPTER 8 - RootCause GUI Reference]]</EM>. Probes in this context are special | ||
| − | [["rcc-6.html#MARKER-9-396">actions</DIV> | + | <!-- [["rcc-6.html#MARKER-9-396">actions</DIV> -- |
| − | [[RCUG_3_Terminology_and_Concepts|CHAPTER 3 - Terminology and Concepts]] that can be performed at points in the currently selected function | + | [[RCUG_3_Terminology_and_Concepts|CHAPTER 3 - Terminology and Concepts]] that can be performed at points in the currently selected function. |
| − | <LI | + | <LI>Click the "On" checkbox. |
| − | <LI | + | <LI>Where it says No Trigger, select Function Entry. |
| − | + | <DIV ID=MARKER-2-815></DIV> | |
| + | <LI>Where it says No Action, select Log Snapshot. | ||
| − | <LI | + | <LI>Where it says ROOTCAUSE_SNAPSHOT, select this and type in "My Snapshot" and hit Enter. |
</OL> | </OL> | ||
<DIV ID=MARKER-10-816></DIV> | <DIV ID=MARKER-10-816></DIV> | ||
| − | |||
<!-- <IMG ALIGN=TOP SRC="sol_probes.gif"> --> | <!-- <IMG ALIGN=TOP SRC="sol_probes.gif"> --> | ||
[[File:RCUG5_sol_probes.gif|600px]] | [[File:RCUG5_sol_probes.gif|600px]] | ||
| − | + | <DIV ID=MARKER-10-817></DIV> | |
| + | <DIV ID=MARKER-10-818></DIV> | ||
| + | We've now requested that the parameter X be logged (recorded) on entry to method <CODE>ataninvint</CODE>, and also that a data snapshot be taken at this point and marked with the Event Name "My Snapshot". | ||
| − | + | <EM>Note</EM>: A snapshot causes data which might otherwise be deleted do to "data wraparound" to be preserved. In this small demo, a snapshot is not really necessary since it doesn't generate enough data to wrap around and cause old data to be lost. See | |
| − | [["rcc-6.html#MARKER-9-371">"Data Snapshots"</DIV> | + | <!-- [["rcc-6.html#MARKER-9-371">"Data Snapshots"</DIV> --> |
| − | [[RCUG_3_Terminology_and_Concepts|CHAPTER 3 - Terminology and Concepts]] for more information. | + | [[RCUG_3_Terminology_and_Concepts|CHAPTER 3 - Terminology and Concepts]] for more information. |
<!-- <H3> Save and Build the Trace</H3> --> | <!-- <H3> Save and Build the Trace</H3> --> | ||
| Line 567: | Line 587: | ||
<OL> | <OL> | ||
| − | <LI | + | <LI>Click the <EM>OK</EM> button at the bottom right of the dialog to save and build the trace and dismiss the Trace Setup dialog. Note that this will take a bit longer this time because we've created Probe |
| − | [["rcc-6.html#MARKER-9-396">actions</DIV> | + | <!-- [["rcc-6.html#MARKER-9-396">actions</DIV> --> |
[[RCUG_3_Terminology_and_Concepts|CHAPTER 3 - Terminology and Concepts]] that require compilation of an | [[RCUG_3_Terminology_and_Concepts|CHAPTER 3 - Terminology and Concepts]] that require compilation of an | ||
| − | [["rcc-6.html#MARKER-9-390">APC</DIV> | + | <!-- [["rcc-6.html#MARKER-9-390">APC</DIV> --> |
| − | [[RCUG_3_Terminology_and_Concepts|CHAPTER 3 - Terminology and Concepts]] file. | + | [[RCUG_3_Terminology_and_Concepts|CHAPTER 3 - Terminology and Concepts]] file. |
</OL> | </OL> | ||
| Line 578: | Line 598: | ||
=== Run With RootCause === | === Run With RootCause === | ||
| + | <DIV ID=MARKER-10-820></DIV> | ||
<OL> | <OL> | ||
| − | <LI | + | <LI>Again, check that rootcause is enabled with either the |
| − | [["rcc-12.html#MARKER-9-2094">rootcause_on</DIV> | + | <!-- [["rcc-12.html#MARKER-9-2094">rootcause_on</DIV> --> |
[[RCUG_RootCause_Command_Reference|CHAPTER 9 - RootCause Command Reference]] or | [[RCUG_RootCause_Command_Reference|CHAPTER 9 - RootCause Command Reference]] or | ||
| − | [["rcc-12.html#MARKER-9-2129">rootcause status</DIV> | + | <!-- [["rcc-12.html#MARKER-9-2129">rootcause status</DIV> --> |
| − | [[RCUG_RootCause_Command_Reference|CHAPTER 9 - RootCause Command Reference]] command. Then run the application by running the pi_demo program | + | [[RCUG_RootCause_Command_Reference|CHAPTER 9 - RootCause Command Reference]] command. Then run the application by running the pi_demo program, as described in |
| − | [["#MARKER-9-759">"Trace With RootCause"</DIV> | + | <!-- [["#MARKER-9-759">"Trace With RootCause"</DIV> --> |
| − | [[]]. | + | [["#MARKER-9-759"|"Trace With RootCause"]]. |
</OL> | </OL> | ||
| Line 592: | Line 613: | ||
<OL> | <OL> | ||
| − | <LI | + | <LI>Click the <EM> |
| − | [["rcc-11.html#MARKER-9-1431">Index</DIV> | + | <!-- [["rcc-11.html#MARKER-9-1431">Index</DIV> --> |
| − | [[RCUG_RootCause_GUI_Reference|CHAPTER 8 - RootCause GUI Reference]]</EM> button in the Workspace Browser window. | + | [[RCUG_RootCause_GUI_Reference|CHAPTER 8 - RootCause GUI Reference]]</EM> button in the Workspace Browser window. |
| − | <LI | + | <LI>In the Trace Index Dialog that comes up, double-click on the SNAP entry labeled "My Snapshot" to go right to where our new probes were added. |
| − | < | + | <DIV ID=MARKER-10-821></DIV> |
| + | <LI>Select the "ENTER ataninvint" node immediately preceding the Snapshot node to see the value of x on entry. | ||
| − | <LI | + | <LI>Select the corresponding "EXIT ataninvint" node following the Snapshot to see the return value on exit. |
</OL> | </OL> | ||
| Line 610: | Line 632: | ||
<OL> | <OL> | ||
<LI>With the "ENTER ataninvint" node selected, right-click to show the <EM> | <LI>With the "ENTER ataninvint" node selected, right-click to show the <EM> | ||
| − | [["rcc-11.html#MARKER-9-1826">Trace Display Popup Menu</DIV> | + | <!-- [["rcc-11.html#MARKER-9-1826">Trace Display Popup Menu</DIV> --> |
[[RCUG_RootCause_GUI_Reference|CHAPTER 8 - RootCause GUI Reference]] and choose | [[RCUG_RootCause_GUI_Reference|CHAPTER 8 - RootCause GUI Reference]] and choose | ||
| − | [["rcc-11.html#MARKER-9-1759">Find Function In Trace Events</DIV> | + | <!-- [["rcc-11.html#MARKER-9-1759">Find Function In Trace Events</DIV> --> |
[[RCUG_RootCause_GUI_Reference|CHAPTER 8 - RootCause GUI Reference]].</EM> | [[RCUG_RootCause_GUI_Reference|CHAPTER 8 - RootCause GUI Reference]].</EM> | ||
<DIV ID=MARKER-10-822></DIV> | <DIV ID=MARKER-10-822></DIV> | ||
<LI>This will bring up the <EM> | <LI>This will bring up the <EM> | ||
| − | [["rcc-11.html#MARKER-9-1842">Find Text in Trace Events Dialog</DIV> | + | <!-- [["rcc-11.html#MARKER-9-1842">Find Text in Trace Events Dialog</DIV> --> |
[[RCUG_RootCause_GUI_Reference|CHAPTER 8 - RootCause GUI Reference]]</EM> with the current function name filled in. Click Next, and the next occurrence of this string will be selected. Thereafter you can continue clicking <EM>Next</EM>, or enter any other string to search for. You can use <EM> | [[RCUG_RootCause_GUI_Reference|CHAPTER 8 - RootCause GUI Reference]]</EM> with the current function name filled in. Click Next, and the next occurrence of this string will be selected. Thereafter you can continue clicking <EM>Next</EM>, or enter any other string to search for. You can use <EM> | ||
| − | [["rcc-11.html#MARKER-9-1763">Find Text in Trace Events</DIV> | + | <!-- [["rcc-11.html#MARKER-9-1763">Find Text in Trace Events</DIV> --> |
[[RCUG_RootCause_GUI_Reference|CHAPTER 8 - RootCause GUI Reference]]</EM> from any the popup or Edit menu to search for any string in the current Trace Display. | [[RCUG_RootCause_GUI_Reference|CHAPTER 8 - RootCause GUI Reference]]</EM> from any the popup or Edit menu to search for any string in the current Trace Display. | ||
</OL> | </OL> | ||
| Line 633: | Line 655: | ||
This chapter should have given you a good overview of the process of developing a trace and gathering data for a program. Now you're ready to try it on your own application. The application you use should be a "debug build" so Trace Setup has the information it needs. See | This chapter should have given you a good overview of the process of developing a trace and gathering data for a program. Now you're ready to try it on your own application. The application you use should be a "debug build" so Trace Setup has the information it needs. See | ||
| − | [["rcc-13.html#MARKER-9-2163">"Selected Topics"</DIV> | + | <!-- [["rcc-13.html#MARKER-9-2163">"Selected Topics"</DIV> --> |
[[RCUG_7_Selected_Topics|CHAPTER 10 - Selected Topics]]. | [[RCUG_7_Selected_Topics|CHAPTER 10 - Selected Topics]]. | ||
Revision as of 21:16, 3 November 2017
RootCause User Guide
Contents
RootCause Demo
RCUG 5 RootCause Demo
rcc-8
This demonstration program, included as part of the RootCause installation, has been designed to provide an introduction and overview of the RootCause product. The program is:
$APROBE/demo/RootCause/C++/pi_demo
It is a simple 2-file C++ program, which computes the value of Pi by iteration using multiple threads. You can find the source in the same directory as the executable file.
The goal of this demonstration is to provide an overview of the whole RootCause process, showing initial definition and tuning of the trace, then collection and viewing of more detailed data about a specific function. The demonstration pictured in this chapter was performed on Solaris. Output should be very similar on AIX and Linux.
Set Up
Before running this RootCause Demo, you must install and set up to use RootCause as described in Chapter 4, "Getting Started". This will define the APROBE environment variable which is necessary to use RootCause.
In the instructions that follow, we'll use $APROBE to refer to the path where RootCause is installed, for example /opt/aprobe.
Use a Local Disk
We recommend you set your current directory to a disk local to the machine you're running on, though this is not required.
Defined X-Windows DISPLAY
Lastly, make sure your DISPLAY environment variable is set. If you're using a Windows client that is running X emulator software such as eXceed or Reflection, we recommend you move to a Unix display for your initial evaluation. If this is impractical, see CHAPTER 8 - RootCause GUI Reference.
Run With RootCause
Run the following commands:
rootcause_on
$APROBE/demo/RootCause/C++/pi_demo
<DIV ID=MARKER-10-714></DIV>rootcause_off
The rootcause_on command enables the automatic logging of every process that is started, and rootcause_off disables this logging. When the pi_demo program is "
CHAPTER 3 - Terminology and Conceptsed" with RootCause, it will be traced according to your specifications as well as simply being logged. The illustration below shows the set up and demo execution..

NOTE: On AIX, the above process is slightly different than shown above. The invocation of the program must be done with the CHAPTER 9 - RootCause Command Reference command directly. For example, the above sequence is changed to:
rootcause run $APROBE/demo/RootCause/C++/pi_demo
See "Enabling RootCause for an AIX Application".
View the RootCause Log
Enter the following command:
rootcause open
This will open the RootCause main window, and then a view of the RootCause log. This shows the CHAPTER 8 - RootCause GUI Reference window, the window for viewing all trace events. On the left is the Event Tree; on the upper right is the source/text window; and on the lower right is the "details" window. In the text window you will see some information about the log file.
Locate the APP_START event (in the Trace Event window) associated with the pi_demo program run earlier. To view information about this event, select the APP_START node in the event tree with a left click. This will fill in "details" about that event in the lower right window.With the APP_START pi_demo node highlighted, right-click to bring up the
CHAPTER 8 - RootCause GUI Reference.
Click CHAPTER 8 - RootCause GUI Reference in the popup-menu of the pi_demo APP_START event.

This will open a CHAPTER 8 - RootCause GUI Reference with the program name and default workspace filled in.
This combination: selecting a node in the tree, then using the popup menu to choose an operation, is the basic way of working within RootCause.
Create a RootCause Workspace
To complete the creation of a RootCause workspace for the pi_demo application:
- Click Ok in the New Workspace dialog to complete the creation of the workspace.

- Click Yes to confirm that you want to register the pi_demo application with this workspace. This registration is how RootCause determines what applications to trace.

You may close the RootCause Log window opened in a previous step.
You now see the RootCause CHAPTER 8 - RootCause GUI Reference. This is described in detail in CHAPTER 8 - RootCause GUI Reference.

Define the Trace
There are several aspects to a RootCause trace:
- Predefined UALs selected from the CHAPTER 8 - RootCause GUI Reference;
- Method and Line traces selected from the CHAPTER 8 - RootCause GUI Reference;
- Probes to gather or preserve data, also selected in the CHAPTER 8 - RootCause GUI Reference; and
- User-written custom probes as described in CHAPTER 10 - Selected Topics.
In this part of the demo we illustrate the use of Predefined UALs and tracing function calls; then we'll return to the Trace Setup Dialog to add some probes. Custom probes are an advanced feature not presented here.
In the RootCause GUI main window, opened in the previous section:
Enable a UAL
Under the CHAPTER 8 - RootCause GUI Reference in the CHAPTER 8 - RootCause GUI Reference:
- Check the checkbox next to predefined UAL labeled
exceptions.ual, as highlighed in the figure above. Simply checking this box will report all user-defined C++ (and Ada) exceptions.
Define Function Traces
Now we'll add traces specific to this application.
- Click on the CHAPTER 8 - RootCause GUI Reference button in the button bar.
This will open the CHAPTER 8 - RootCause GUI Reference, showing the modules of the application in the CHAPTER 8 - RootCause GUI Reference. The CHAPTER 8 - RootCause GUI Reference identifies the modules, files, functions, methods, and data in the program, and allows you to specify complex actions on each function and method.
For this demo we'll first just specify a trace on the functions in the file pi_demo.cpp, then return later to add data and probes.
- Click on the "lever" icon next to the
pi_demomodule to expand it; then expand the/tmp/demodirectory, so you see the nodes for the source filespi.cppandpi_demo.cpp. - Click on the
pi_demo.cppsource file node, then right-click to see the CHAPTER 8 - RootCause GUI Reference. - Click CHAPTER 8 - RootCause GUI Reference pi_demo.cpp.
- Click the OK button at the bottom right of the dialog to record the trace and dismiss the Trace Setup dialog.

Trace With RootCause
As was done in the preceding section, "Run With RootCause", run the following commands:
rootcause_on
$APROBE/demo/RootCause/C++/pi_demo
rootcause_off
Or, for AIX:
rootcause run $APROBE/demo/RootCause/C++/pi_demo
This time, since the program is registered with a workspace, it will be traced as specified in the workspace, and the resulting output will be recorded within the workspace. There will be some startup delay, but if you notice that the program runs slower once started, this is probably because your workspace is being accessed across the network from your machine. See CHAPTER 10 - Selected Topics.
View The Data Index
We're now ready to view the data generated by running with our Trace. This is discussed in detail in CHAPTER 3 - Terminology and Concepts.
In the CHAPTER 8 - RootCause GUI Reference window, do the following:
- Click the CHAPTER 8 - RootCause GUI Reference button. This will bring up the CHAPTER 8 - RootCause GUI Reference for the most recently generated data.
- In the Trace Index Dialog, click the CHAPTER 8 - RootCause GUI Reference button.
- In the CHAPTER 8 - RootCause GUI Reference, check "Exceptions" to index exception events, then click CHAPTER 8 - RootCause GUI Reference to close the dialog and refresh the Index. You should now see something like the dialog below:

- In the Trace Index Dialog, double-click on the second item in the table, the first item with an Event name of C++ EXCEPTION.
This will open a Trace Display Dialog centered at that C++ Exception event, as shown below.

Examine and Revise the Trace
The C++ Exception trace event selected from the index should appear highlighted in the Trace Display. This was a result of checking exceptions under "Enable a UAL" above.
The ENTER and EXIT nodes are a result of the "Trace All In pi_demo.exe" action added under "Define Function Traces" above.
You can see more information about the exception in the CHAPTER 8 - RootCause GUI Reference in the lower right.
If you scroll to the top of the Event Trace, you should see three threads: one for the main thread, and one for each of the threads which is started to compute Pi.
The event tree is a call tree, and can be very useful. From an ENTER or EXIT node in the tree you can use the CHAPTER 8 - RootCause GUI Reference to:
- remove the called function from the set of functions to be traced,
- find the next reference to the same function in the trace events, or
- go to the function in the CHAPTER 8 - RootCause GUI Reference to trace additional information.
As you step to each event, the CHAPTER 8 - RootCause GUI Reference may show additional information about that event. See CHAPTER 8 - RootCause GUI Reference for a more complete description of this window.
Take some time to explore the event tree. Then we will look at using the information available here to revise or "tune" the trace used in the next run.
Call Counts
Useful information about the functions called in your program may be obtained by looking at the call frequency as shown in the CALL_COUNTS table.
- Select (left-click) the SYN_CALL_COUNTS node, near the end of the event tree.
- Right-click (with MB3) to show the CHAPTER 8 - RootCause GUI Reference on this node.
- Click CHAPTER 8 - RootCause GUI Reference. This will open a table listing each called function and the number of times it was called.
- Select (left-click) the
extern:"_start()"entry in the call count table. - Right click to show the popup menu.
- Select CHAPTER 8 - RootCause GUI Reference in the popup menu.
You can also CHAPTER 8 - RootCause GUI Reference to search for functions in the call tree, and remove them from there.
You can also search for functions in the call tree, and remove them from there.

- When you've finished making changes to the trace, click the Dismiss button at the bottom of the SYN_CALL_COUNTS table window, and then
- Click the CHAPTER 8 - RootCause GUI Reference button in the main window.
- Notice the effects of removing these calls in the next trace we generate.
NOTE: In most "real" programs, high-overhead functions selected for tracing are automatically identified and disabled via CHAPTER 3 - Terminology and Concepts, and are listed in the CHAPTER 8 - RootCause GUI Reference associated with the LOAD_SHED node at the end of the event tree. This demo doesn't run long enough for the load shedding heuristics to apply. See CHAPTER 3 - Terminology and Concepts for a general discussion of load shedding.
Tracing The Details
So far we have seen how the RootCause process works by:
- enabling a predefined UAL (exceptions);
- defining a simple trace from the Trace Setup Dialog;
- running the application under RootCause;
- choosing an event in the Trace Index Dialog;
- viewing events in the Trace Display; and
- modifying the trace by selecting functions from the call counts table.
RootCause allows you to record much more than the entry and exit of functions and threads. You can record data values and insert probes as well.
Open Trace Setup
- Click the
CHAPTER 8 - RootCause GUI Reference button in the Workspace Browser to return to the
CHAPTER 8 - RootCause GUI Reference.
This is just as in "Define the Trace" above, but this time we'll record some details about a specific function,
::ataninvint.
Select A Single Function
- Click the "lever" to expand the M pi_demo node to see the Source Files in the module.
- Expand the pi.cpp node to see the methods.
- Select the
ataninvintmethod. This will bring up the source code for this method in the CHAPTER 8 - RootCause GUI Reference, and show a tree of data to log inataninvintin the CHAPTER 8 - RootCause GUI Reference.
Log Parameters
- Check the box for variable X in the Visible On Entry subtree, and for the return value in the Visible On Exit subtree.

Add a Snapshot Probe
- In that same lower-right area, click on the Probes tab to show the
CHAPTER 8 - RootCause GUI Reference. Probes in this context are special
We've now requested that the parameter X be logged (recorded) on entry to method
ataninvint, and also that a data snapshot be taken at this point and marked with the Event Name "My Snapshot".Note: A snapshot causes data which might otherwise be deleted do to "data wraparound" to be preserved. In this small demo, a snapshot is not really necessary since it doesn't generate enough data to wrap around and cause old data to be lost. See CHAPTER 3 - Terminology and Concepts for more information.
Save and Build the Trace
- Click the OK button at the bottom right of the dialog to save and build the trace and dismiss the Trace Setup dialog. Note that this will take a bit longer this time because we've created Probe CHAPTER 3 - Terminology and Concepts that require compilation of an CHAPTER 3 - Terminology and Concepts file.
Run With RootCause
- Again, check that rootcause is enabled with either the CHAPTER 9 - RootCause Command Reference or CHAPTER 9 - RootCause Command Reference command. Then run the application by running the pi_demo program, as described in "Trace With RootCause".
Index the New Trace
- Click the CHAPTER 8 - RootCause GUI Reference button in the Workspace Browser window.
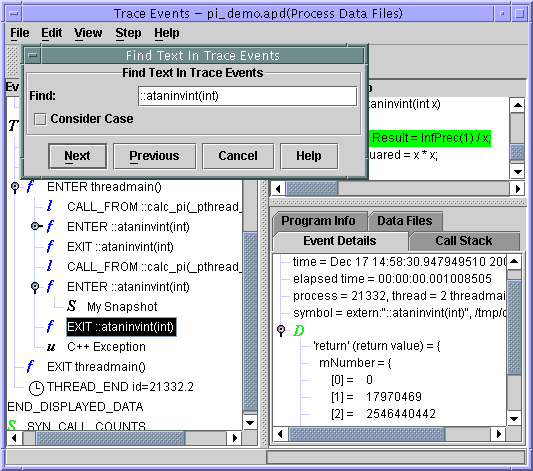
- In the Trace Index Dialog that comes up, double-click on the SNAP entry labeled "My Snapshot" to go right to where our new probes were added.
- Select the "ENTER ataninvint" node immediately preceding the Snapshot node to see the value of x on entry.
- Select the corresponding "EXIT ataninvint" node following the Snapshot to see the return value on exit.
Find the Calls Of Interest
The Trace Display window opened from the Trace Index Dialog operation will contain many events, including other calls to
ataninvint.- With the "ENTER ataninvint" node selected, right-click to show the CHAPTER 8 - RootCause GUI Reference and choose CHAPTER 8 - RootCause GUI Reference.
- This will bring up the CHAPTER 8 - RootCause GUI Reference with the current function name filled in. Click Next, and the next occurrence of this string will be selected. Thereafter you can continue clicking Next, or enter any other string to search for. You can use CHAPTER 8 - RootCause GUI Reference from any the popup or Edit menu to search for any string in the current Trace Display.
Where To From Here?
This chapter should have given you a good overview of the process of developing a trace and gathering data for a program. Now you're ready to try it on your own application. The application you use should be a "debug build" so Trace Setup has the information it needs. See CHAPTER 10 - Selected Topics.
Copyright 2006-2017 OC Systems, Inc.

